3-Minute Outlook Add-In Quick Start Guide ⏯
Outlook Add-In Tips & Tricks ⏯
1-Hour Complete Outlook Training ⏯
User Preferences ⏯
In order for the Outlook Add-in to function properly, it must be configured to connect with your Satuit. Simply follow the steps below. After launching Microsoft Outlook, select the Add-Ins menu.
To configure Satuit Outlook Add-In setting in Microsoft Outlook to connect to Satuit:
- Click SatuitCRM or Add-ins at the top of your email ribbon
- Click Satuit Technologies if applicable
- Select Settings
- Enter your company-specific URL (Example: https://www2.satuitcrm.com/companyname)
- Click Verify URL
- Now type in your Satuit Username and Password
- Click Test Connection
- Click Save
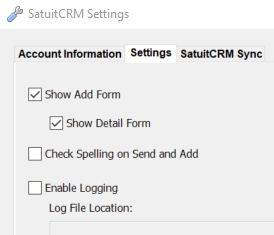
The Outlook Add-In allows each user to customize his or her experience when using the add-in to add emails to Satuit.
- Show Add Form - When adding email via Outlook Add-In this will display the Add form when checked, the recommended setting is ‘Off’
- Show Detail Form - When adding email this will display the Detail form allowing you to edit the email when checked, the recommended setting is ‘Off’
- Check Spelling on Send and Add – Enabling this feature will cause Outlook to automatically spell check your message before sending
To enable the above features you will need to follow the below steps:
- Click SatuitCRM or Add-ins at the top of your email ribbon
- (If applicable) click Satuit Technologies
- Select Settings
- Then select the Settings tab in the pop-up
- Enable the features of your choosing
If you are working in Outlook, there are many useful features for pushing emails, contacts, meetings, and tasks into Satuit.
Sending Outlook Data to Satuit ⏯
There are 3 methods for adding an email that already exists in your Outlook folders to Satuit:
- Highlighting the email and clicking the ‘Add To Satuit’ button in the ‘Toolbar Commands’ group of the Add-ins Tab
- Right-clicking the email in Outlook and selecting ‘Add To Satuit’ from the context menu, or
- Double-clicking the email to open it and clicking the ‘Add To Satuit’ button on the Ribbon
Note
All emails added to Satuit will automatically be marked complete.
After using one of the methods above, the Add Email to Satuit window will appear. The Outlook Add-in will try to automatically match the sender/recipient of the email with a contact in the CRM, based on the email address.
You can add additional contacts to the activity by searching for them in the Search Criteria box and double-clicking the contact in the results window. From the Attach Contacts window, you can select/deselect matched contacts in order to include/exclude them and to indicate which contact should be considered the Primary Contact for the activity.
If a match is not found, the email address will appear in the Unmatched Contacts window, where you can add the contact to the CRM on the fly!
The Outlook Add-in will automatically mark an email as Outbound if it is added from the Sent folder, using the Send and Add feature, or via the Satuit2GOMail address. All other emails will be marked as Inbound. There is a field in Satuit that stores this flag, which can be configured to the Search and Detail forms if desired.
Once you have selected contacts and managed attachments, click the Create Activity button to push the email into Satuit as an Activity Record.
Note
If you have chosen to display the Detail Page a window will open containing the Activity Detail Form for this activity, allowing you to modify/update any other fields, as necessary.
Bulk Add Emails
The Outlook Add-in will also allow you to add emails to Satuit in bulk, adding up to 99 records at a time. The process is very similar to adding a single email, start by selecting multiple emails in Outlook, either by Ctrl+Left-clicking or Shift+Left-clicking, then using one of the 3 methods for adding an email to Satuit. There are a couple of differences when adding messages in bulk that are important to be aware of:
- The Add Email window will not display when adding emails in bulk
- The Add-in will attempt to match to a contact based on email address. If a match is not found, the activity will be placed in the Unassigned Items area of Satuit, and any unmatched contacts will be added to the Unassigned Contacts tab (More Details on Unassigned Emails can be found in section Unassigned Emails
- If there are attachments that are not excluded by your Satuit System Administrator, a window will appear to allow you to handle each attachment. (Details on handling attachments are discussed in the next section)
Email Attachments
The Outlook Add-in allows you to organize attachments and to specify document types (e.g. presentation, proposal, letter, etc.). The list of Document Types comes directly from the Document Type field in Satuit. It is also possible to exclude certain files: Executable files that may contain malicious code (i.e. .exe, .bat) are blocked at the server level, and cannot be added to Satuit at all. Your Satuit System Administrator can determine what other file types are permitted to be automatically added to Satuit, and which types are excluded from being automatically added. The System Administrator can also limit what size attachments can be added, up to 32MB.
When adding a single email with attachments to Satuit, the Add Email to Satuit window contains a section that lists any attachments that are part of that email.
Note
If the filename is grey and italicized, it means the size of the attachment exceeds the maximum upload size set by your System Administrator.
If the file type has been excluded, the checkbox next to the file name will not be checked. To include this attachment anyway, simply check the box. If the file type has not been excluded, the box will be automatically checked, to not include the attachment with the activity, simply uncheck the box. The Description field will be automatically filled in with the Subject line of the email, you can edit it here if you desire.
Enter the Document Type
When adding emails in bulk, any email that contains an attachment with an approved file type will appear in an Items with Attachments window, where you can choose to include it or not. If the file type has been excluded by your System Administrator, it will not appear in the window.
Adding a New Email
To add an email you have just composed to Satuit, simply compose the email as you normally would, then, instead of clicking the Outlook Send button, click the Send and Add to Satuit button on the Ribbon. This will automatically send the email and open the Add Email to Satuit window.
Warning
The Send and Add button will not automatically spell check your email unless you have enabled the Check Spelling on Send and Add option in the Add-in Settings!
Satuit Outlook Add-In Side Panel (Satuit versions 16.3 and above)
With the latest version of our Outlook Add-In, we will feature a side panel within Outlook. The panel will provide information related to the Email and Email Sender from SatuitCRM. Information Includes:
- High-level Contact Information
- Email Status in the CRM
- Upcoming and Recent Activities
- Open Opportunities
Handling Unmatched Contacts
If the email you are trying to add to Satuit is not matching a contact in the CRM, it could be for one of two reasons. First, if your Satuit System Administrator is blocking the domain of that email address, it will not match, even if they are a contact in Satuit. More often, the individual is simply not a contact in the Satuit database, or their email address in Satuit is different than the one associated with the email.
To reduce the number of steps when adding a contact using the Outlook Add-in, the contact’s ‘First Name’ and ‘Last Name’ fields will auto-populate with the contact details from the Outlook message when available.
The Contact Exists in Satuit
If you know the person is a contact in Satuit, you can use the search options in the Add Email to Satuit window to search the database for the person, or the person’s business/entity. Once located, you can attach them to the activity by double-clicking them in the results list.
The Contact Exists in Outlook but Not in Satuit
If you have the contact in your Outlook address book, but they haven’t been added to Satuit yet, you can easily open their Outlook entry and add them to Satuit using the same techniques used to add emails. Once they have been added to Satuit, the Add-in will be able to match them when adding the email.
The Contact does not Exist in Either Location
If the contact does not exist in either Outlook or in Satuit, it is easy to add them on the fly, right from the Add Email to Satuit window!
Simply highlight the email address you want to add from the Unmatched Contacts section and click Add Contact. This will open the Add Contact window, where you can search for the Business/Entity that the contact should be associated with, then add the contact details, click OK, and the contact will be added to Satuit. When the window closes, you will find the new contact automatically listed in the Attach Contacts window.
Add To Satuit Functionality (Satuit Versions 16.3 or above)
Managing items added from Outlook to Satuit is easy with the "Add To Satuit" functionality. When adding items to SatuitCRM via the Outlook Add-In, users can immediately manage any items added that could not be matched to an existing Entity within SatuitCRM. The two available options are "Fix Now" and "Manage Later".
- "Fix Now" - Within the "Add To Satuit" confirmation window, users will be provided the option to Manage Now which will allow them to manage unassigned items during the send.
- "Manage Later" - This will close the "Add To Satuit" confirmation window and store any unmatched items in the "Unassigned Items" section, awaiting to be updated at the user's convenience.

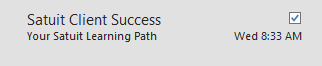
AddedToSatuit Checkmark
How can you tell which emails from your inbox or Sent Items have been added to Satuit? Add the custom field ‘AddedToSatuit” as a column. This will display a checkbox next to your emails indicating it has been added to Satuit.
Tip
This flag will also be enabled if the same email has been added by another user of Satuit.
Configure Checkbox
- On the View tab, click Add Columns, this will open the Show Columns dialog box
- Click Select available columns from the box and scroll down and Select User-defined fields in Inbox
- Select AddedToSatuit column, and then click 'Add →' this will move the column over to the right-hand side window. Depending on your view, you can change the order of the columns by dragging and dropping the columns.
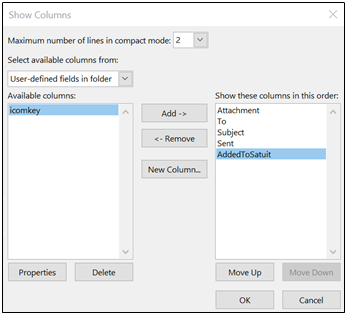
- Click OK to save your changes and apply your new view
If you do not see the AddedToSatuit column from the user-defined fields then you can manually create the column.
- Click New Columns
- Type in AddedToSatuit in the Name section
- Select Yes/No for Type
- Select Icon for Format
- Click OK and Add the new field to your view
A checkbox will now appear against any emails that have been added to Satuit. Depending on the size of your folder this may take a few minutes to update.
Applying the Checkbox to Other Folders
You can apply this view to other Outlook folders enabling you to see which emails have been added to Satuit.
- Select the View tab and select Change Views
- Select Apply Current View to Other Mail Folders...
- In the Apply View dialog box, please check the folders which you want the view to be applied
- Click OK
If you need to remove the checkbox for any reason select 'Add Columns' under the View tab and then select the AddedToSatuit column and '← Remove'.
Sending Satuit Data to Outlook ⏯
Email a Contact or Multiple Contacts
- From a browse list - Select the Contact you wish to email and double click to open the Contact detail form
- Click the Email icon from the Contact Detail screen
- Select ‘Email Contact’ to email an individual contact
- Select ‘Email Multiple Contacts’ to email to your selected contact and other contacts (a list of contacts and linked contacts will appear)
- Select ‘To’ or ‘CC’, if selected for the multiple contacts
- A new email form will open in Outlook with all the contacts in the To: or CC: lines
Tip
If you have added the contact’s email to your browse list, you can click directly on the email address to open a new Outlook email to that contact, if you have enabled Smart Clicking. (*Smart Clicking is found under Tools→Preferences→Personal Settings→Enable Smart Clicking)
Add to Calendar/Invite Attendees
From any open Activity record, click the Add to Calendar icon and choose ‘Add To Outlook’ or ‘Invite Attendees’ to create a new calendar item in Outlook that contains the Activity details. Selecting ‘Add To Outlook’ will create an Outlook Appointment, to create an Outlook Meeting that includes the Primary Contact and Additional Contacts, select ‘Invite Attendees.’ When an Activity is added to the Outlook Calendar using ‘Invite Attendees’, key information is included:
- The email addresses of the Primary Contact and any Additional Contacts will be added to the To: field
- The address of the Primary Contact is added to the Location field
- Any attachments that are part of the Activity in Satuit will be included
- As of the Spring ’17 Release, you can customize the details included in the body of the Appointment/Task with the ‘Activity – Add To Outlook’ Email Export Template (found in the System Administrator tools)
Email/Email Contacts/Email BCC Contacts
From any open Activity record, click the Email icon, then:
- Select Email: a new email will open in Outlook with the Activity details, and where the To: field will be blank
- Select Email Contacts: a new email will open in Outlook with the Activity Details, and where the To: field will be populated with the email addresses of all the contacts from the Activity
- Select Email BCC Contacts: a new email will open in Outlook with the Activity details, and where the BCC: field will be populated with the email addresses of all the contacts from the Activity
Add to Tasks
From any open Activity Record, click the ‘More…’ icon, and select Add to Tasks. A new task will open in Outlook with the details from the Activity in the body of the Task. Users can customize the details included in the body of the Appointment/Task with the ‘Activity – Add To Tasks’ Email Export Template (found in the System Administrator tools).
Emailing Other Documents, Opportunities, and Account Details
In addition to Activities, you can also email Document records, or include details from a sales opportunity or a client account in an email. From the Detail Form, click the ‘Email’ icon to open a new email message in Outlook, with details from the Satuit record.
Tip
This feature can be quite helpful for internal notifications related to new clients or for emailing an existing client a document in Satuit.
If the Satuit record contains an attachment, it will be included in the email message as an attachment.
Need more or less information included in the export? Don’t like the default look and feel? Your Satuit System Administrator or Business Administrator can modify the Email Export Templates for each type of export!