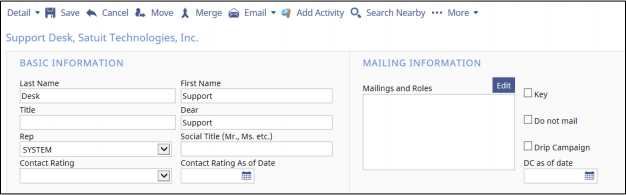
A form as seen from the user interface:
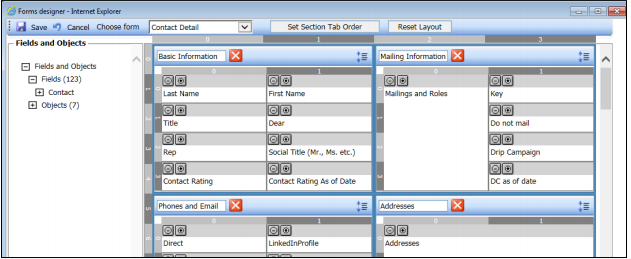
Configuration view of the same form:
Note
The blank spaces in the sub-forms. When you create these place-holders, it takes only a minute to add a new field. If you create your main form as a single form with no sub-sections, it is more time-consuming to edit this form at a later date.
When designing a form keep the subform sizes standard; this will allow for easier redesign and make the form more eye-pleasing for users.
Unassigned Field Types: Naming Conventions
You will notice that additional fields in the configuration tool have been labeled by field type to help you pick from the long list of available fields. For example, date fields are named with a UDF Date 1 (see example below) convention, memo fields are named UDF Memo 1 (see example below) and picklists are named UDF Picklist 1.
When you are doing any configuration changes, keep the following guidelines in mind:
- If you remove a field from the user interface, you rename that field using the prefix “old” or XXX in front of the current name. This will make it simpler to see which fields are in use and which fields are not in use. This will also prevent you from using a field that may have pre-existing data in them
- When adding a new field to a detailed screen, make any label changes to that field before doing any configurations. This will make the field easier to locate when configuring
- Leave space within sections. This will allow you to easily add fields in the future should the need arise
- Always print a screenshot of a detailed screen before making any changes
- Keep in mind if you are removing fields from details forms the field may also be present on reports or users may have the fields included within their browse lists. Consult others before making changes that could have an impact on user’s day to day use
Sub-Forms
To facilitate the addition of fields to a form, we have grouped similar types of information into sub-forms. Each main form will have several sub-forms. A sub-form can be edited without changing other sub-forms on the main form. In the Satuit prototype setup, we have deliberately left some blank space in some sub-forms. This makes it easy to tweak forms without a lot of re-configuration. Detail forms in Satuit are made up of a series of sub-forms. Fields are individual elements that can be added to a sub-form to customize the layout of a detailed screen. Each sub-form has some additional space to add more fields. The examples below illustrate both the use of sub-forms to create a detailed view as well as the flexibility created by leaving room for additional fields in the future.
Accessing Configure Forms
Click on Tools in the lower-left corner of your Satuit screen and select System Administrator.
Important
This tool is only available to Certified Satuit System Administrators. If you do not see this option and would like to arrange training, please contact Client Services at support@satuit.com.
Reset Layout/Cancel and Close
If you would like to revert to the Satuit default layouts for one of your detail screens, you may use the Reset Layout at the top of the configuration tool window.
If you would simply like to end your session and revert to the detail screen layout that was in place before beginning your session, click Cancel and Close icon. This will revert to the last saved version of the detail screen.
Important
If you click the Reset Layout button you will lose all changes made in your current session as well as any previous sessions. This will return the current detail screen to the original Satuit default layout. Always print a screenshot of a detailed screen before making any changes.
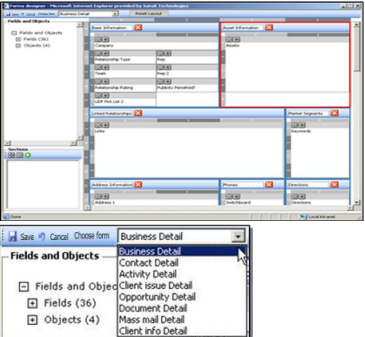
Select a Form to Configure
When you open the Configure Forms tool, the default form is the Business Detail screen (see screenshot below).
You may choose a new form to configure by selecting the new form from the main toolbar (choose form). When selecting a different form, your layout on the screen will change to display the sub-forms of the selected detail form.
Adding a Field
Individual fields can be added to any of the sub-forms within a detailed screen, provided there is space permitted. As you can see from the screenshots of the Opportunity Detail form below, there is room to add fields in each of the sub-forms (Basic Information, Pipeline Information, or Revenue Information) on the detail screen shown below.
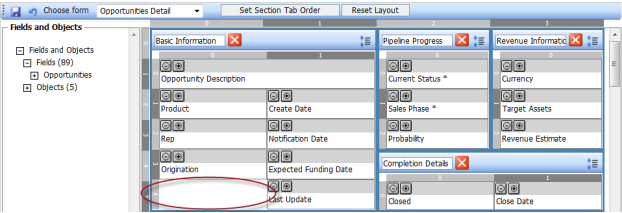
To add a new field to the available space below the Origination field (found in the Basic Information sub-form), click on the “+” next to the word Fields on the left-hand side of the configure form screen. The complete list of fields available for that detailed form will appear on the left-hand side of the screen. Locate the field name that you wish to add. Next, click on the sub-form to which you would like to add the new field. This will highlight that sub-form; the outside border will be highlighted in red. Click on the field name to add; this will add a dashed outline of the field to insert.
Use the green arrows to place the field into the desired location as described below:
- Height – Use the down arrow to increase the height or click the up arrow to decrease
- Width – Use the right arrow to increase a field’s width or you can decrease the width down by clicking on the left arrow
- Top – Use the down arrow to control where you would like the top of the field to be placed. In the example above, you would click the top-down arrow 4 times to place the field directly under the last field
- Left – Click on the arrow that points to the right to move the field to the right or to move the field to the left click on the arrow that points to the left
After you have placed your field outline in the correct location, click Insert to insert the field.
Editing Field Properties (Read-Only, Required)
The form configuration tool allows you to alter the properties for each field in the detail screen by making it either Required or Read Only.
- Select the field
- Click the ‘bull’s-eye’ radio button to view
- Select from Read-only and/or Required. If you do not want either, leave them blank
By selecting a field as ‘Required’ it does not add an “*” to the label. To add an asterisk or special character to any label Click into Label Edit to modify a label.
Allowing for Multiple Contacts for Activities and Documents
To allow a user to select multiple contacts to associate with a particular activity or document, as the System Administrator, you may need to configure the screen to allow this to occur.
To allow for multiple contacts, remove the existing contacts field and re-add the field with a height of at least 3. You may need to rearrange your Detail form.
Click on the properties for this field  icon. This will open up the Properties window. Check off the Allow Multi-pick option.
Adding an Object
Detail Screens in Satuit are made up of both Fields and Objects. Objects in Satuit are pre-built groups of fields that can be used in the detail screens. In the example below, the Phones and E-mail, and Addresses sub-forms both include objects.
Contact Detail Configure Form
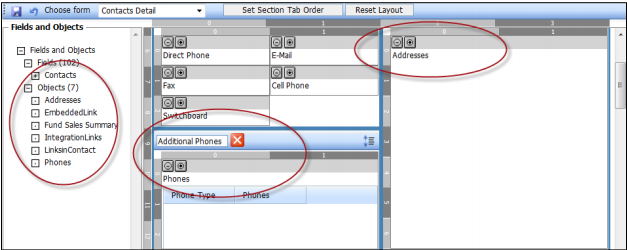
In the examples above, we see screenshots of the Contact Detail form. The screenshots above show four different sub-forms within the detail screen. The subforms are Basic Information, Mailing Lists, Phones and Email, and Addresses.
Fund Sales Summary Object
The Fund Sales Summary object allows users to import, search, view, and report on consolidated summary fund sales data at the Business or Contact level. This type of data is particularly useful for SMA and retail teams but can be extremely useful for other groups as well. These tables can be used to capture and view data for:
- Fund Purchases, Redemptions, Gross Sales, and Current Balance by Fund
- Viewable by Business or Contact
- Group By Fund
Removing a Field
In the field itself directly above the label of the field, you have two buttons. The first button is to remove the field; by simply clicking on the button you will remove this field from the detail form.
Important
If you remove a field from the user interface, you should rename it with the prefix “old_” or XXX in front of the existing name. This makes it easy to identify previously used fields and field types the next time you want to configure the form. It will be a very labor-intensive process to determine what fields are not in use if you continually remove fields without resetting the label.
Fields that Should NOT Be Removed or Duplicated on a Form
There are a few fields within the Satuit database that are key fields, that are used in very specific ways, and that may be linked to many tables. You cannot change the intended purpose of these fields (a Rep is a Rep) and you cannot remove these fields from a form nor should you recreate these fields using an unassigned field.
You may relocate these fields and you may edit values if these fields are a picklist, but you must respect the intended purpose of the field or it may impact other forms and other functions.
- Rep (cRep)
- Product (cProduct)
- Contact First/Last Name (cFirst, cLast, cContact)
- Company/Entity Name (cCompany)
- Activity Type (cActivity)
Important
Removing, duplicating, or changing the intended purpose of any of the above fields will have a serious negative impact on end-user functionality.
Adding a New Sub-Form
- Click in a blank space in the detail form where you would like to insert your new sub-form. This will create a dashed outline; use the position/dimension pop-up to determine the size and location of your sub-form. Once you have sized your sub-form and determined the desired location, click on Insert to insert a blank sub-form into the detail form. Type in the title of your sub-form, you may now begin adding fields to your sub-form.
- Once your changes are complete click Save.
- Next to the title of all sub-forms, you will see a red box with a white X inside of it. Click on this X to remove a sub-form. Your sub-form will be moved to the sections where you can add it back at any time.
Important
Once a subform has been inserted, it cannot be resized. A sub-form may be moved by removing the sub-form and then replacing it (using the steps described above) in the desired location.
Embedded Links
Embedded Links can be used to place an active webpage directly in your detailed form. The Embedded Link Object will allow you to place a link directly to view another office system or to see a website. Adjust the properties of the link by clicking on the objects property button and entering the webpage link. Embedded links can be added to the screen by accessing your Configuration tools, Configure Forms.
Setting Section Tab Order
This tool allows you to set the order in which users will tab through the sub-forms.
- Click on the ‘Set Section Tab Order’ button.
- Then use the navigation arrows to set the order, then click Save.
Setting Field Tab Order
To set the tab order for fields within the sub-form:
- Click on the ‘Set object tab order’ icon and use the navigation arrows to set the tab order.
- Then click Save.
Configure Detail Form Titles
Each detail form contains a title. The titles are used to highlight key fields from the form.
The following is a list of default title setups for each form:
- Business – Business_Name, City
- Contact – First_Name Last Name, Business_Name
- Opportunity – Business_Name, Product, Opportunity_Description
- Activity – Contact, Activity_Type, Start_Date, REP
- Document – Document_Type, Description, Enter_Date
- Mailings and Events – Mailing_Description, Contact, Date_Sent
- Account – Legal_Account_Name, Product
- Deal Flow – Deal Description, Deal Phase, Deal Status, Expected Management Fee
Click into Configure Form Title to change the default titles per detail form within the configuration tools. Select the Form to Configure.
Add the Fields from the ‘Available Field Names’ section to your ‘Current Field Names’ section to create your form title. Once you have all of your fields positioned; Double click on the separator column to add separators between the field names.