Overview
This guide is for Certified System or Business administrators. The tools that are described within this manual are only available to those individuals that have attended training at Satuit Technologies.
This document covers all the functions of the Satuit System Administrator. Based upon the permissions granted specific functions may not be available under your user ID. The System Administrator tools are very powerful and should only be granted to trained individuals on your team.
Accessing the System Administrator
From the main menu on the left side of your screen, click on Tools and then select System Administrator.
IMPORTANT ON-PREMISE INSTALLATIONS:
We strongly recommend that you immediately change the DEFAULT System Administrator’s password.
Security Menu
Below is a listing of all the items that are available in the security menu section. If you do not see any of the items below you may not have the proper permissions to access them or they may be related to an add-on item within Satuit that is not enabled within your site.
Users
From the menu select Security and click on Users. To grant access to specific products you can select the checkbox as long as you have available licenses for that item. If the license is not available, then you will need to follow the screen prompts when asking if you would like to purchase licenses.
Editing a Rep
Select Users from the System Administrator menu.
Select the Rep name from the list of users on the right-hand side; double click to open the details of the Rep. The specific Satuit products must be selected for the User to access them; SatuitCRM, SatuitCRA, or Sauit2GO and any additional modules.
- Rep – This is normally the first initial of the given/first name and the last/family name. See the note labeled IMPORTANT before making any changes to this field
- Full Name – This is the Rep's full name
- Title – This is the Rep’s title
- Email – This is the Rep’s email address. NOTE: We suggest only accepting the company-provided email address in this box. Each email must be unique
- Additional Email Addresses – Any additional email addresses a rep may use to send emails from Satuit2GO should be added here
- Phone – This is the phone number for the Rep
- Approved – This field must be checked for the user’s Satuit license to be active. If this is not checked they will not be able to use Satuit
- Unlock this Rep – If a User has entered in their password incorrectly 3 times* their Satuit license will become locked out for 10-minutes*; to allow them access before the 10-minutes you may select Unlock and then click Save
- Reset User’s Password – To reset the users’ password click on the checkbox and then click Save, a system-generated email will be sent to the user with a link to reset their password
- Reset User’s Home Page – If a user is getting an error on their Home Page it may need to be reset to the default settings. Click the check box and then Save, the user’s Home Page will be restored the default view
- Assign User Roles - This option enables and disables the rights each user has. Any roles/permissions granted are additive, meaning that if you grant rights to a feature/field in one role that user will always have that right even if you deny them the right to that feature/field in another role.
- Teams for this User - If Team Privacy is enabled, you can select which Team(s) this user is assigned to for purposes of Team Privacy. This feature is helpful if you have multiple groups using Satuit where some groups may enter data that should only be seen by them. An example may be a Private Equity team has sensitive information about a deal they are working on that cannot be viewed by the Institutional Team.
- User Groups - This feature will allow customized Detail Form and Search Form configurations for each User Group, making the system highly configurable to support multiple teams. (Available in v16.5+)
Unlocking a Rep
A Rep’s password has expired or s/he has been locked out.
- Select 'User' from the System Administrator menu
- Click on 'Unlock Rep'. This will allow the System Administrator to unlock the Rep’s login if a Rep has been locked out. Lockouts are usually caused when s/he has tried to log in multiple times with an invalid password. The number of attempts allowed before being locked out can be modified in the Password Rules Configuration section. The initial value is 3 attempts.
- Note: If a Rep has been locked out due to multiple failed attempts, it will be unlocked after the number of minutes specified in the Login Rules
Resetting a Rep’s Password
If a Rep has forgotten their password, the System Administrator can force a temporary password to be sent to the email address or you can have the user reset their password by clicking on the Forgot your password link on the Login screen.
Click on the 'Reset Password' icon and a reset password link will be sent to the user’s email. Password Reset.
Users Forgot Password
We have improved the password reset functionality so it functions without the need to use a security question. Users can also request a password reset by following the simple steps below.
- Click on 'Forgot your password'
- Enter in your Satuit user name and email address, click on 'Next'
- You will receive a confirmation pop-up window indicating that your password has been
reset. An email will be sent to your email address. Click on the link within your email or copy and paste the link into your Internet Explorer address bar - Once you have clicked on the link in your password reset email you will be prompted to change your password. Enter in your Satuit user name then enter in a new password and re-enter your new password. Click on 'Confirm Password Reset'
- Once the details have been confirmed you will receive a notification that the password has been reset; click on the link 'Click here to log in to your account'
Add a User
You can add new users to your Satuit account without having to contact the Satuit Client Support
team.
Note
If you have any questions regarding license counts or purchasing any additional licenses please contact client support before proceeding.
- Click on the 'Add' icon and follow the screen prompts to add a new user
- If you do not have any available user licenses; you will receive a prompt asking if you would like to purchase new licenses
- Click 'OK' to purchase more
- Enter in the number of licenses to purchase in the license(s) needed column
- IMPORTANT: After purchasing additional licenses an invoice will be sent out referencing
the changes that you have made to the license count - After clicking 'OK' to purchase new licenses you will receive the pop-up window asking you to confirm the number of licenses to be added and asking that you confirm the purchase by signing with your initials
- To complete the purchase, click 'OK'
- To cancel the addition of new licenses, click the 'Cancel' icon
- IMPORTANT: If you make a mistake during this process contact Satuit Technologies
support immediately - After the license(s) have been added you may now proceed with adding the new Reps
- Click on the 'Add' icon to start filling in the new representative’s details
- Once you have completed filling in the details; Click on the 'Save' icon. To make the license active sure to click on the 'Approved' checkbox
The email address that you have filled in for the new user will receive an email with the Rep name and Password. For security purposes, the Satuit site address is not on the email; we suggest you provide this to them separately.
Reassign User License
The Rep field has been made Read Only, to update the Rep field in the event of a name change, such as in marriage, you will need to contact Satuit Support.
If you are looking to reassign a user license you will need to first delete the existing Rep, then click to add a new one. All undone items previously assigned to the old rep can be searched for to reassign them or you may select an existing rep to assign the items to.
When deleting a Rep, users have the option to leave all open records assigned to the Rep or move all records to another Rep. Once the Rep is deleted, that license becomes available for use. The Deleted Rep field is available for adding to the Business and Contact Search forms. This addition allows for users to search for Businesses and Contacts that belong to a Rep that has been deleted.
User Groups (v16.5+)
To help streamline the entry and management of forms, the Administrators can create User Groups, then create a detail and search forms that has the optimal form layouts for each team that utilizes your instance. You can assign power users to multiple groups and allow them to toggle between layouts. If a user isn't assigned a group they will receive the default layout.
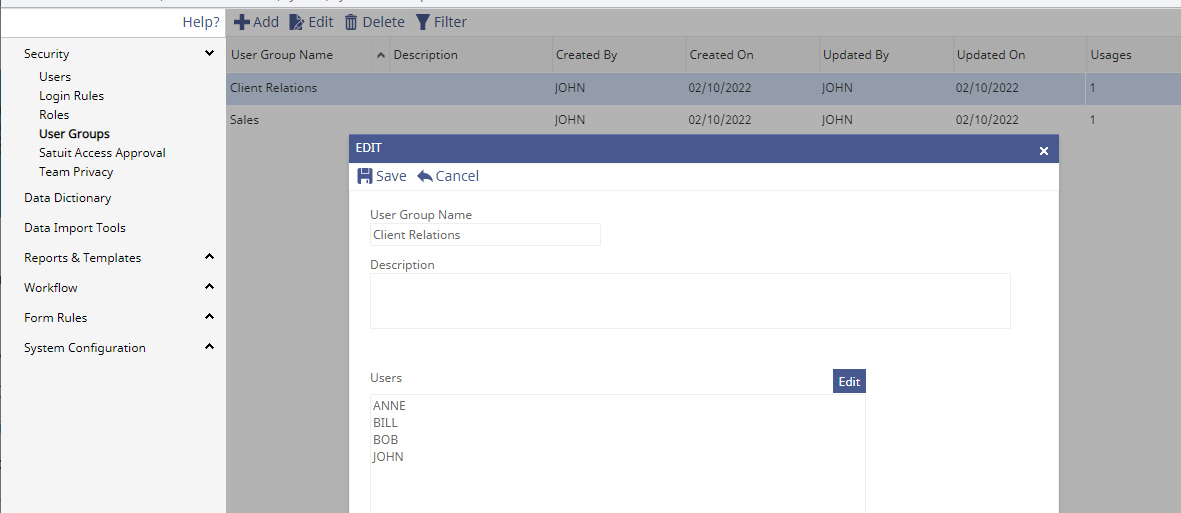
The User Groups option is found under the Tools -> System Administrator -> Security -> User Groups. From here you can add, edit, and delete User Groups. You can also assign Users to the User Groups from this window as well as from the "Users" option.
NOTE: To create Detail and Search forms for each User Group, go to the System Configuration -> Configure Forms menu.