Satuit does not charge for advice on configuration, so please do not hesitate to contact us. We spend a lot of time helping users understand when a change is a good idea, and when it is not such a good idea (maybe even a bad idea).
Your Satuit database is a key tool for your business and changes can have an impact that you did not intend. Also, you should push back on overly complicating the interface or just creating a bad design (if you are using lists of checkboxes on one screen, chances are you are designing a form with built-in limitations).
- Create a process for managing change requests. Many companies have created a
team of power users who meet monthly to discuss change requests. If you have a small group of users, your weekly team meetings might be a good place to bring this up - Force users to ask for changes in writing. You may use the Satuit Change Request Form or you may create your own form to manage requests for configuration changes from end-users. That way, you can avoid the “configuration du jour” request from users
- Make screenshots. Before starting any configuration project, always take screenshots of your current layout of the Satuit Detail Screens you plan to work on
- When in doubt – check with Satuit. We will be happy to discuss any proposed changes to your detail screens prior to your making those changes
- Make configuration changes at low usage times. While making configuration changes will not impact an end-users ability to use Satuit, seeing fields come and go will most certainly cause confusion among end-users
- Reconfigure the search screens - After making changes to the Details Screen, you may need to revisit the search screens to add or remove fields that have changed on the details screen
- Review the Summary screens to make sure added or removed fields are adjusted
- When making changes to detail forms keep sub-form sizes aligned to ensure an eye-pleasing design and ease of use for future configurations
- Notify users in writing of changes
Modifying Field Labels
The Labels option under the System Configuration menu allows you to change the label names of any Satuit field.
Important
This does not mean you can change the intended use of any field. Some fields are general-purpose fields, and some have specific use. Certain fields within the database are intended for specific use (City is always meant to be the field in which a user would enter the name of the city in an address). Some fields are used in more than one table.
- Select 'Labels' from the System Configuration
- On the right side of the screen, use the drop-down menu on the top of the screen to select the table that contains the field you wish to change. This will list the current names of all of the customizable fields in that table
- To change a field label, highlight the name to be changed and double-click. The label details dialog box will appear, make the necessary changes to the label and click the 'Save' button
- To modify a field name in a different table, click the 'Label Edit' menu, scroll down, highlight the desired table, and change the appropriate field name
- To print a list of all labels in Satuit and what table they are used on, simply click on the 'Print' button on the label dialog box
Modifying Picklist Values
Click on 'System Configuration' and select 'Picklists' to make additions or changes to picklist values. From this menu, you can also 'Print' picklist values.
Global Picklists
Satuit has 10 Global picklists for use. When editing picklists these are located under the heading 'Global Picklists'. The 'Global Picklists' allow you to use the field on multiple tables without having to maintain multiple picklists within multiple fields.
Editing Picklist Values
- Under System Administrator, go to 'System Configuration' → 'Picklists'
- A list of Satuit tables will display. To access the picklist under those tables, continue to click the plus icons to the left of the table names. The editable picklists within the tables will display
- With the mouse, select the picklist to be altered. Double-click to edit the existing value. Click away to save the value
- To add a new value in the picklist, select the 'Add' icon, then enter your new value in the 'New Picklist Value' that was just added to the list, click away to save
- The new value will appear alphabetically in the value list window and is now available for selection in Satuit
Picklist Ordering⏯
System Administrators can define a custom sort order for all Picklist values with drag and drop functionality. This functionality enables cleaner-looking charts, graphs, dashboards, and Saved Views. The Picklist items will be displayed on the Detail and Search form.
Note
If the custom sort order is enabled, new Picklist items will be added to the end of the Picklist order until modified by the administrator.
Do Not Delete or Modify Picklists
The following values should NEVER be deleted or modified. The values below are tied to Email integration and reports.
Activity Type:
- Appointment
- Phone
- Task
Important
Specific fields in Satuit should NEVER be changed or modified a list of Special Use fields can be obtained in the Data dictionary report.
To Delete a Picklist Value
Warning
Before removing a picklist value, check to make sure that the value is not currently in use. If the value is currently in use, then use the Merge Picklist Values function If you do not merge the values or change they will be blank upon deletion. The next section in this manual explains how to use this function.
To delete an existing value, highlight the item to be removed and select the Delete icon. Satuit displays a window with the message Are you sure you want to delete? To permanently remove the picklist value, click OK. If the value is being used and you choose to delete it will leave those records blank.
Merging Picklist Values
Occasionally, a picklist value that is in use needs to be merged into another value. For example, you have been using both Meeting and Appointment as values under the Activity picklist and you realize that you should only be using Appointment as the picklist value. To replace this value within existing records that contain Meeting as the Activity, please follow the steps below:
- Click the picklist value to be merged and select the Merge this value icon
- From the Merge dialog box, select the new value and click OK
- All of the existing Satuit records containing the old value will be replaced with the new value
- To avoid the old value from being used again, we recommend deleting it from the
system - To print all items on a picklist, click on the Print icon while viewing a picklist
Note
Once finished with merging the picklist values, it is now possible to delete the value no longer being used. To delete a picklist value, follow the instructions noted in the previous section.
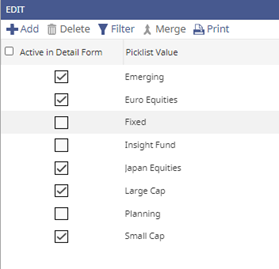
Picklist Management – Active in Detail Form
Products do not last forever but it is important to track what products your accounts and opportunities were for even if that product is no longer active. With this in mind, we created the Active in Detail Form checkbox. When you click Edit on the product picklist you will see a new column labeled Active in Detail Form. All picklist values will default to being checked off as Active in Detail Form. By unchecking the box the value will no longer be available to be selected on the detail forms. You will still be able to search on any value that is unchecked in the Active in Detail Form checkbox.
In v16.0+ System, Admins can designate which Picklist values are available to be selected on the Detail form for ANY Picklist field.
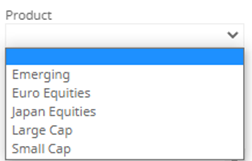
The historical records will not be impacted, and the disabled value will still be available on the Search screens.