Bulk Upload
The Bulk Upload feature enables users to upload either a ZIP folder or PDF file into the application, parse it into multiple files, and create Document records for each file.
Note
If you intend to search for records by accounts, you will need to have an Accounts Recipient List first. Please check out the below Client Info Recipient List section.
.ZIP ⏯
The Bulk Uploader will search your specified .ZIP folder for a unique identifier that is contained within each of the individual PDF file names.
-
Press Bulk Upload and the Bulk Add Documents window will open
-
Select Add Template
-
Select .ZIP as the File Type
-
Choose the Search Criteria of Equals if you want the entire name of the files within the Zip folder or choose Contains if you want to search for a string within the file name
-
If you have the Accounts/Client Module, you can choose to search on Contact field or Account fields, Contact will be selected by default
-
Select the Search Field in either the Contact record or Account record in Satuit which is the unique file identifier in the file name
-
If Accounts is selected, then please specify your Recipient List
-
Once you have clicked Next, enter document details to create document records so they can be stored in SatuitSIP® Investor Portal and click Save Template
-
After the template is saved, you must then choose the correct template and select Run Template. Choose the necessary .ZIP file and select Run Template
Instead of looking at the name of the file in a Zip folder, the PDF Bulk Uploader will search each page in the consolidated PDF file for a unique identifier that corresponds to an individual client or account. The identifier will determine your search criteria below.
- Press Bulk Upload and the Bulk Add Documents window will open
- Select .PDF as the File Type
- The Search Record section specifies which table the unique identifier is located, choose either Contacts or Accounts
- Select your Search Field from the list of available Satuit fields
- If Accounts is selected, then please specify your Recipient List
The header, footer, and measurement type settings specify the portion of the document to be searched for the unique identifier.
- Select your Search area of the Entire Page, Header, or Footer; this where inside of each PDF page the system should search for your matching field
- Specify the Offset, selecting either inches or centimeters to limit where the application should search; the smaller the search area the more targeted and faster the search will be
- Select Next This will open the Add File Name Format Window
- The File Name Format is made up of any combination of text and/or Available Field Names from the left side menu; you can select from fields within SatuitCRM to personalize the name of the file. For example, to create a naming convention “Quarterly Statement for John Doe – 31 Sept 2020.pdf”
- Enter the text “Quarterly Statement for “
- Double-click on Contact → First Name from the Available Field Names
- Double-click on Contact → Last Name from the Available Field Names
- Double-click on Custom → Last Quarter End Date from the Available Field Names
- Select Next and the Document Detail window will open
- Enter document details as needed to create document records and press Upload
NOTE: This creates the document records in the Satuit Application. -
Enter the text “Quarterly Statement for “
-
Double-click on Contact → First Name from the Available Field Names
-
Double-click on Contact → Last Name from the Available Field Names
-
Double-click on Custom → Last Quarter End Date from the Available Field Names
-
Select Next and the Document Detail window will open
-
Enter document details as needed to create document records and press Save Template
-
After the template is saved, you must then choose the correct template and select Run Template
-
Choose the necessary .PDF file and select Run Template
Recent Bulk Document Uploads
This feature enables you to configure your Document search screen to include an object that shows a list of recent bulk uploads. The list shows each completed bulk upload job where documents were created over the last 30 days. When included on the Document search screen, you can use this feature by itself or include other criteria in your search such as REP or Product metadata. Common uses for this feature include reviewing the list of recent bulk uploads to run spot checks on the documents, identifying records that may need additional cleanup, or creating a list for internal reporting.
The Recent Bulk Document Uploads object is also available as part of the Publish to Portal feature. This means that in addition to doing a document search to generate a list of documents to publish you can go straight to Publish to Portal and select from the recent bulk document uploads list directly. Users can select one or multiple uploads and as with the My List option, only unpublished documents are available to be selected for publishing.
Client Info Recipient List
If you have the Client Info Module you will be able to create a recipient list by searching for linked accounts or names.
- Press Account Recipient List if you have Client Info Module
- Enter a name and description for this list
- Press Add button and search on the contact name or portfolio code
- Press Add when finished (you can hold down the control key and select multiple accounts or recipients)
Create an Account Recipient List Based on the Mailing List
- Go to “Advanced Search”→ ”Accounts Linked Contacts”
- Enter the criteria you want to search on (i.e. Mail Lists = Quarterly Invoice)
- Under the “Show Options” section, select the “Return Type” of “Linked Contacts by Account”
- Click “Search” to get the list of contacts and their associated accounts
- Under the “Documents Uploader”→ ”Accounts Recipient List” option, select the list you want to add to OR add a new list
- Under the “Account Recipients” section, click “Add”→ ”Contacts from my list”
- Select the contacts you want to add by checking the boxes on the left. Once all proper contacts are checked, click “Add” then “Done”
- Back on the “Account Recipient List” window, click “Save”
Account Recipient Lists Display (Available in v16.7+)
In addition to viewing and modifying the Account Recipient Lists under the Document Uploader section, you can view them under the Account Contacts grid. This allows the user to view all Linked Contacts on an Account Recipient List and Bulk Document Upload templates for a selected account bringing the multiple facets related to the Account Recipients onto one screen, reducing the number of steps needed to complete the process. 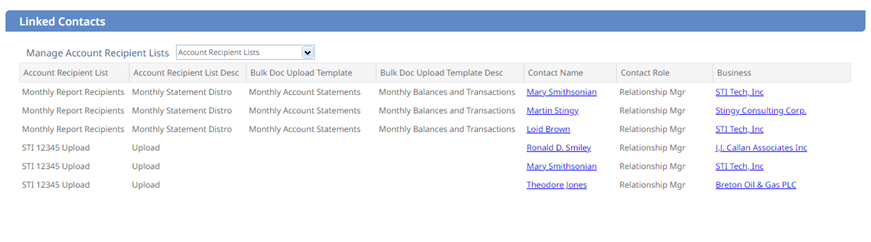
Bulk Upload Automation
Bulk Document Upload automation leverages the BulkAPI and the SatuitSDX Utility to automatically retrieve the Bulk Document file from your local server and process the file utilizing the appropriate Bulk Document Upload Template. Please see the Bulk API section and the SatuitSDX section for assistance with setting up each item.
Steps:
- Open System Administrator and navigate to Satuit Data Exchange, then select SDX Configuration
- Select Add and then choose Bulk Doc Upload
- Enter a Schedule Name and Description
- Select a Bulk Document Template that you have created
- Next enter email addresses of anyone who needs to be notified of any errors that occur related to the upload
- Enter the full path for file location on your server
- Set the Recurrence Pattern and the Range of Occurrence.
-
(OPTIONAL STEP) To move processed files to a post-processing folder on completion:
- Select “Move file after processing?” checkbox
- Enter file path for the post-processing folder
- When finished, select Save
NOTE: This feature requires the Satuit API, contact your Satuit Client Success Representative for additional information.