Contact Overview ⏯
Add A Contact ⏯
Adding a new contact is similar to entering a new business. Satuit will search the database to find other contacts with the same last name (a.k.a. family name or surname).
- From a list of search results, click to select the business to which you wish to add a contact. Alternatively, you may search from the add new confirmation window if you have that confirmation option enabled within your preferences
- Click 'Add New' to add a contact and select 'Contact' from the drop-down menu
- An Add New Record window will display (if enabled) asking you to confirm that you wish to add a record to the current Business; Select Yes to continue
- Satuit displays the Name Verification dialog box. Type only the contact’s last name in the 'Last Name' field, select the type search you want to do (starts with, ends with, or contains), and click the Search button
- If the contact does not already exist, then continue to enter the new contact by clicking the 'Create New' button
- The Contact Detail form will display
- Complete the fields in the Contact Detail form as thoroughly as possible
- If you mark your contact as Key, they will display on your browse list in Blue text
- IMPORTANT: Any field that is outlined in Red is required
Contact Image Object ⏯
Info
*Requires v16.0+
Your Satuit administrator can add the new Contact Image Object to the Contact Detail and Summary Forms for an easy drag and drop photo upload process from any image or website. For example, you can right-click on any image in LinkedIn to download and then drag the image to Satuit.
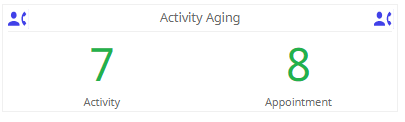
Contact Activity Aging Object
Info
*Requires v16.0+
The Activity Aging object (much like the Opportunity Aging object) tracks the number of days since the last activity and last appointment were completed with a contact. This makes users visibly aware that they may be neglecting a contact. The numbers will be green if the current aging is less than 30 days; blue if between 30 days and 90 days, or red if greater than 90 days. The data comes from the existing calculated fields.
Entering a Contact's Address(es)
The Contact Detail form allows for up to three addresses to be entered for a contact. By default, the Business address with be automatically added to the contact(s) record as Address 1.
To Remove the default Business Address, click the Clear button.
Editing a Contact Address
- If the contact's address is not the same as the business address, simply edit the address or select address 2 or 3 to enter in a default mailing address
- If you do not want the business name included in the contact’s address, uncheck the Copy Business Name checkbox. Un-checking this option is useful for family offices such as ‘The Smith Family’. You have the option to include or exclude the Business Name when copying the address
- Otherwise, type in the address in the appropriate address box
- Type the mailing address of the contact
- Click the Save icon to save all changes
Enter Multiple Contact Addresses
- Click the Number 2 button
- Enter the second address in the same method as the first address
- If necessary, enter the third address in the same manner as the second address, selecting the Number 3 button
Address Types
The contact address selection 1, 2, or 3 is highlighted to help determine which address record is active. To choose an Address Type, simply click on the dropdown picklist. This feature allows you to select the address type from a picklist; you will indicate the type of address (Home, Office, PO Box, Winter / Summer home).
Mailing Address
The Mailing Address will default to address 1. If this is not to be the case check the Mailing Address box on the alternate address entered.
Phone Information
The Phones and Email sub-form makes it possible to enter various means of communication with a contact.
- First, type in the contact phone numbers for the standard phone types
- For the Additional phone types, click the ‘Add’ on the blue toolbar, select the appropriate Phone Type from the drop-down menu, and type the phone number
- Click Save at the top of the screen to save any changes made to the Contact Detail form
Modify or Delete a Contact Phone Listing
- From the Contact Detail form, click in the field that you would like to edit and make changes, click Save at the top of the screen to save any changes made to the Contact Detail form
- To delete a standard phone number, from the Phones dialog box highlight the number, press the delete key on your keyboard, and click the Save
- To delete a non-standard number, click the 'X' icon, and click Save
- IMPORTANT: Contact numbers can only be changed at the contact level
Entering Contact Mailing List Items
You can categorize contacts by their Mailing List needs. More than one item from this list can be selected per contact.
To add a Mailing List item:
- Click the Edit button to assign mailings for a contact
- Check off the mailing(s) to be added to this contact and click OK
- To remove a selected mailing, un-check the keyword and click OK to remove it
- Click Save at the top of the Contact Detail form to save changes
Entering a Contact's Interests
Categorize contacts by their interests. More than one item from this list can be selected.
To add an interest:
- Click the Edit button to assign interests for this contact
- Check off the interest(s) to be added to this contact and click OK
- To remove a selected interest, un-check the keyword and click OK to remove it
- Click Save at the top of the Contact Detail form to save changes
Contact Other Info
This form contains personal information about the contact.
The Comments field can be used to enter in personal information about a contact that you would like to have but doesn’t fit into a standard field. Other fields may include Administrative Assistant, birthday, the best time to call, etc. (These field names may vary based upon customizations)
- Click the Save icon to save the changes made
- Click the Cancel changes icon on the toolbar to cancel the changes made
LinkedIn Contact Search
We have made it easy to search for the LinkedIn profile of contact from Satuit, the LinkedIn icon on the Contact detail form will open a new browser window/tab with the results of a First Name + Last Name search on LinkedIn. Once users have identified the direct URL for that contact, they should save that URL for that record for future use by clicking on the chain icon next to the LinkedIn button, avoiding the need to search and select a contact in the LinkedIn window when the direct URL is present.
Private Data
Satuit provides a way for you to store sensitive private data, sometimes known as Personally Identifiable Information (PII), for your Businesses, Contacts, Accounts, and more. Using the Private Data feature in Satuit, you can store information such as SSN, Tax ID, Date of Birth, and more in a location that is not accessible except within the detail form (No reports, browse lists, etc.). There are also user permissions to control who can see Private Data, and who can add/edit/delete Private Data.
The user permissions associated with this feature are VIEW_PRIVATE_DATA, EDIT_PRIVATE_DATA, and CONFIGURE_PRIVATE_DATA. For more information, please contact your Satuit System Administrator or Satuit Client Success.
Emailing a Contact
Using MS Outlook email:
- Select the contact you wish to email
- Click the Email icon from the Contact Detail toolbar
- Or you can click on the email address directly from a Contact browse list
- Select Email Multiple contacts to send to that contact and others within that business or linked to the business
- Microsoft Outlook will automatically open with a new email message. The new email will populate with the first email address entered in Satuit
- To send the email, click Send
- You will receive a pop-up asking if you would like to create a record of the email within Satuit. Click Yes to open the activity record, the email information will pre-populate and you can fill in any extra details as necessary