Activity Quick Start Guide ⏯
Next and Last Activities ⏯
u
Adding a New Activity
Activities can be tracked (i.e. appointments, phone calls, or outstanding client issues), using the Activity tab. This form is useful for tracking open issues with clients or for tracking any interactions that must be monitored. This information can be exported directly to Microsoft’s Outlook calendar, tasks, or email.
- From the Business Browse List, highlight the business for which an activity is to be added. Click the Activity tab to see the list of all activities currently associated with this business
- You can also open a contact record and hit the Add Activity icon on the toolbar, click "Add New" and select Activity
- An Add New Record window will display asking you to confirm that you wish to add a record to the current Business; Select Yes to continue
- Define the fields in the Activity Detail form as thoroughly as possible
- If it is a completed action check "Completed". If it is a future activity such as an appointment or follow-up do not check the box
- Click the "Save" icon to save this activity, or click the "Cancel" icon to cancel adding this activity. You may also click the Link to Sales Opportunity icon to link to an opportunity
Note
There is auto-prompting to ask if you would like to notify another REP if you change one of their Activities or if you add an Activity for them
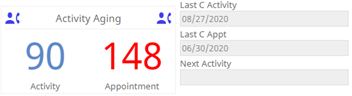
Activity Aging Object
On the Contact detail form, the Activity Aging Object tracks the number of days since the contact's last activity and appointment. The numbers will show up in:
- Green - Last Activity/Appointment in the last 30 days
- Blue - Last Activity/Appointment between 30 to 90 days
- Red - Last Activity/Appointment greater than 90 days
This is a quick way to visualize contact engagement that is also available with the Last Contact Activity and Last Contact Activity fields.
Note
*Requires v16.0+
Status Field


The Activity Status field on the Activity Browse List helps you quickly identify completed, future, and incomplete Activities.
- The green star indicates present-day or future Activities that have not yet been completed
- The red exclamation indicates Activities that are past due
- A blank status indicates completed Activities
Tip
To draw attention to past due Activities, sort by the Activity Status field to show past due Activities first.
To configure the Activity Status field:
- Click Configure on an Activity Browse List
- Within the pop-up window, expand Activities on the left panel
- Drag and drop the Status field from the left panel to the right
Full-Screen Comment Field
The ‘Full Screen’ option on the ‘Activity comment’ object is enabled by clicking on the ‘four arrows’ icon. The memo field expands into a bigger window, enabling users to view and edit the notes. Once completed, users would click on the icon again to minimize the object to its normal size.
End Date/Times Automatically Adjust
Satuit will automatically modify the ‘End Date’ when a ‘Start Date’ on the ‘Activity’ detail form is moved backward or forward, keeping the dates aligned with each other. A similar functionality moves the ‘End Date’ backward or forwards the same amount the ‘Start Time’ is moved.
Activities with Multiple Contacts
Activities can have multiple contacts associated with each activity. To add multiple contacts to the activity, click on the Edit button. Contacts that are added to activities will also have their last appointment and last activity fields updated as well.
Add External Contacts
When adding additional contacts, you can also search for External Contacts to associate the activity to as well. Click Add External Contacts and Search for the Contact by the last name and click Add to associate them to the activity.
Emailing Additional Contacts
You can send out an Activity to everyone on the activity detail form by using:
- Email contacts
- Email Templates
- Add to Calendar
The Activity details will be exported along with the Contacts and additional email addresses.
Emailing Appointment
We have two options for exporting an appointment from Satuit, ‘Add to Calendar’ and ‘Invite Attendees’.
Clicking Add to Calendar:
- The Subject line will be created as Contact Name | Business Name | Subject
- The Location field will be filled in with the Primary Contact’s address
- Date and time copies over into Start and End time fields
- Details from the Activity
Clicking Invite Attendees:
- The primary and additional contacts’ email addresses will be in the "To" field
- The Subject line will be created as Contact Name | Business Name | Subject
- The Location field will be filled in with the Primary Contacts address
- Date and time copies over into Start and End time fields
- Details from the Activity
For ‘Add to Calendar’ and ‘Invite Attendees’, the above settings are the standard default. Your system administrator can configure the exports within the system administrator tools upon request or you can contact Satuit support to request customization of export.
Automatic Update from Outlook
When you start an Appointment within Satuit and push it out to Outlook you can take advantage of the ability to update the Appointment within Outlook and the Satuit Outlook Add-in will automatically prompt you if you would like to update the Appointment in Satuit.
Recurring Activities
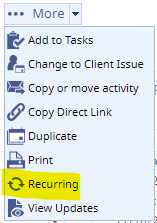
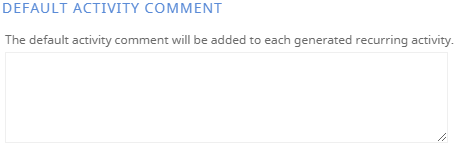
- Select the Recurring icon from the Activity Detail form Toolbar to set your specified recurrence pattern; enabling you to set the date range for your recurring activity as well as the activity comment that appears in your recurred activity.
- An Activity Type must be selected before you can select 'Recurring' under the 'More' dropdown.
- The recurrence window allows the user to set the recurrence pattern, range of recurrence, and default activity comment.
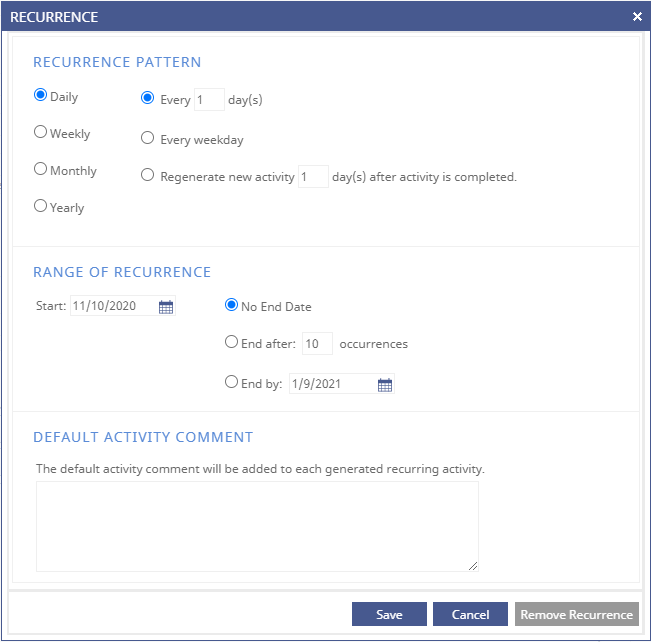
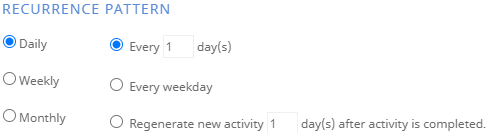
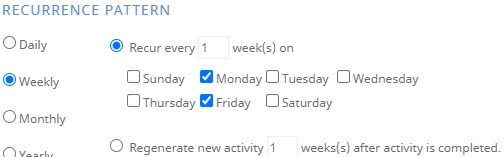
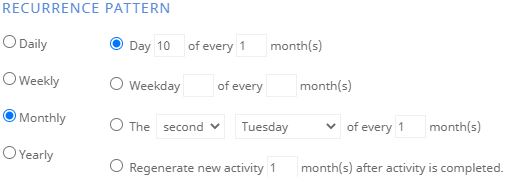
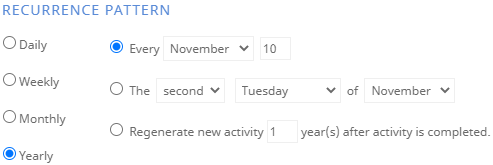
- The recurrence pattern can be set based on many factors including Daily, Weekly, Monthly, and Yearly schedules.
- Daily - Every 'x' day(s), Every weekday, or Regenerate new activity 'x' day(s) after activity is completed
- Weekly - Every "Sunday, Monday, Tuesday, Wednesday, Thursday, Friday, or Saturday" or Regenerate new activity 'X week(s) after the activity is completed
- Monthly - Day 'X' of every 'X month(s), Weekday 'X' of every 'X' month(s), The "First, Second, Third Fourth, or Last" "Day, Weekday, Weekend Day, Sunday, Monday, Tuesday, Wednesday, Thursday, Friday, or Saturday" of every 'X' month(s), or Regenerate new activity 'X' month(s) after activity is completed
- Yearly - Every "January, February, March, April, May, June, July, August, September, October, November, or December" 'X, The "First, Second, Third, Fourth, or Last" "Day, Weekday, Weekend Day, Sunday, Monday, Tuesday, Wednesday, Thursday, Friday, or Saturday" of "January, February, March, April, May, June, July, August, September, October, November, or December", or Regenerate new activity 'X year(s) after the activity is completed
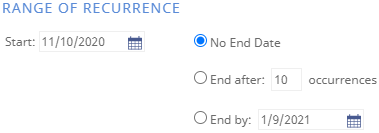
The range of recurrence allows users to set an activity recurrence to occur forever or stop based on a certain number of occurrences or a specific end date.
The default activity comment is for the first activity in a recurrence. Any comment changes made to the current recurrence will automatically reflect once saved in the next recurrence.
A 'Recurring' value will be listed in the activity detail form toolbar to let the user know this is the master activity and any updates to it will affect the next recurrence if saved.

If a user has the master 'Recurring' activity open, they may select the 'More' dropdown, 'Recurring' value, and then select 'Remove Recurrence' to keep the reminder but stop the recurrence from continuing to recreate.

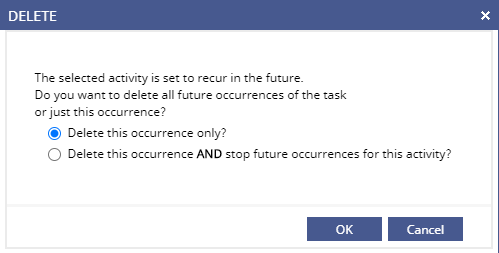
Users also have the ability to delete a recurrence, which will provide them with the following pop-up to "Delete this occurrence only?" or "Delete this occurrence AND stop future occurrences for this activity?".
Exporting from Satuit to Microsoft Outlook
- Select either ‘Export an Activity to an Outlook Appointment’ or ‘Export an Activity to an Outlook Task’ located in Additional Options.
- Export an Activity to an Outlook Mail Item
- Save and close your activity in Microsoft Outlook or send your activity as an email
- Email an Activity with an attachment by clicking on the Email icon from Satuit, the document will be added as an attachment to the email
- Email a document record and the attached document directly by simply clicking on the 'Export this Document' icon to send the document details and document as an attachment to your email
- There are options to select from when emailing an activity from Satuit. When selecting Email Contacts and Email BCC Contacts, the primary and additional contacts within the activity will be added to a new email in the To: or BCC: fields, respectively
- System Administrators will also be able to configure a separate Email export template for each Email option
Copying an Activity to another Company
To copy an activity to another company in the database, click the Copy or Move Activity icon. You will then be asked to enter the name of the business to which you wish to copy the activity. Enter the business name and select the appropriate business from the list and click Copy. You will receive a message which confirms that the activity has been copied to the selected business.
Moving an Activity
To move an activity to another company in the database, click the Copy or Move Activity icon. You will then be asked to enter the name of the business to which you wish to move the activity to. Enter the business name and select the appropriate business from the list and click Move.
Duplicating an Activity
To duplicate the activity details, click on the duplicate activity icon. It will automatically duplicate the activity and you can assign/enter the activity for another Rep.
Print Activity Detail
To print details of the current activity, click on the Printer icon on the Activity Detail form.
Calendar Option
The Calendar gives users several options for choosing what they want to see and can switch between a more typical calendar look and feel and a list format. Learn more about the Satuit Calendar.
Click on Calendar from the navigation menu.
- View: This option will allow you to switch between the List or Calendar view
- Options: Will allow you to make your selections for the following categories: Recurring, Hot Items, Done, Reps, and Activities or Product