Creating .mrg Forms in MS Word
To create customized merge (.mrg) forms for use in SatuitCRM, the .mrg documents need to be initially produced using MS Word. A customized .mrg form is a specialized template designed to populate itself with certain fields and be used repeatedly by SatuitCRM. To have this functionality, the .mrg form will contain bookmarked SatuitCRM field names. When accessing the .mrg file through the merge documents function on any Contact detail form, each bookmark pulls data from the current SatuitCRM contact record. Some examples of .mrg documents that can be created would be faxes, letters, order forms, and proposals.
To create a new .mrg form:
- Create a new document in MS Word
- Select the Show/Hide ¶ Button on your MS Word toolbar
- From the File menu, select Options
- Under Word Options, select Advanced, scroll down to the Show Document Content section and check the box next to Show Bookmarks
- Position the cursor on the MS Word document where you want to incorporate data from SatuitCRM
- Type the field name that corresponds to the SatuitCRM data to be inserted into the document. (SatuitCRM contact field names can be referenced in the next section called Contact Field Names)
- After inserting all of the field names and any other essential text within this document, each field name needs to be manually selected and made into a bookmark
- To bookmark each field name, highlight the first field name in this form document. For example, the first field name would be first
- Press CTRL+C to copy the field name to the clipboard
- Select Insert from the menu bar and select Bookmark from the drop-down menu. Press CTRL+V to paste the field name within the Bookmark dialog box
- Click the Add button
- Repeat these steps for each subsequent field name added to the .mrg form
- When finished with bookmarking all the field names in the form document, save the file in double quotes (" ") with the extension .mrg
- To use the new .mrg form, you must upload it using the SatuitCRM System Administrator
Using the .mrg Form
Any .mrg form can be accessed through the merge documents button from any Contact Detail form. It is recommended to test any newly created .mrg forms to ensure they work properly.
To access the .mrg form from Satuit:
- Locate a contact by performing a Contact Search
- Open the Contact Detail form
- From the Contact Detail form, click on the More button, then select Merge Documents
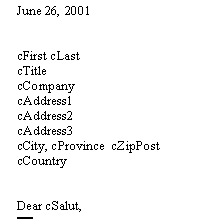
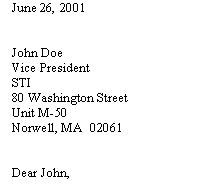
- Select the appropriate .mrg file. The document should be populated with the correct contact information. For example, the below letter .mrg form was designed to have the following field names:
BEFORE
AFTER
Contact Field Names
Listed below are the contact field names with their corresponding labels that can be added to any .mrg form.
|
FIELD NAME |
DEFAULT LABEL |
|
CPREFIX |
Prefix |
|
CFIRST |
First Name |
|
CLAST |
Last Name |
|
CTITLE |
Title |
|
CSALUT |
Salutation |
|
CBUSINESS |
Business |
|
CADDRESS1 |
Address 1 |
|
CADDRESS2 |
Address 2 |
|
FIELD NAME |
DEFAULT LABEL |
|
CZIPPOST |
Postcode |
|
CCOUNTRY |
Country |
|
CCPHDIRECT |
Direct |
|
CCPHDIRFAX |
Fax |
|
CCEMAIL |
|
|
CCPHCELL |
Cell |
|
CCPHUSER1 |
User-Defined Phone Type |
|
CCPHUSER1 |
User-Defined Phone Type |
|
FIELD NAME |
DEFAULT LABEL |
|
CADDRESS3 |
Address 3 |
|
CCITY |
City |
|
CPROVINCE |
State/City |
|
CCPHUSER1 |
User-Defined Phone Type |
|
FIELD NAME |
DEFAULT LABEL |
|
CUDF1 |
User-Defined Field 1 |
|
CUDF2 |
User-Defined Field 2 |
|
CUDF3 |
User-Defined Field 3 |
|
CUDF4 |
User-Defined Field 4 |
|
CUDF5 |
User-Defined Field 5 |